Restricting access to course activities and resources isn't something I use in my own classes and I'm not a big fan of overdoing it with this feature, but there are times when it comes in handy. This lesson covers how to set up access restrictions for everything in one week in a Moodle class.
Edit the Weekly Summary

Turn editing on and click the edit icon under the dates for the week you wish to restrict. This gives you access to the weekly Summary.
Set up the restrictions

There are a number of options that can be set to restrict access. The simplest approach is to have the week become visible to students at a specific date and time. To do this, click the Enable button next to Allow access from, and choose a date and time. For many students, it may be more convenient if the material is available a few days before the week officially starts, so in this example, I have set it up so the week of August 20-26 will become visible on August 17th. You can also set a date when access will be stopped by enabling the Allow access until setting and choosing a date and time.
Grade conditions

Setting up a grade condition allows you to require that each student complete a task with a specific grade before they can see what is in this week. The grade condition can be used instead of the date settings or it can be combined with the date settings. For example, you could add a quiz to Week 1 and require that students complete the quiz with at least 80% correct before they can view Week 2. If you leave out the date settings, they could move on to Week 2 as soon as they have completed the Week 1 quiz with 80% corect.
To set the Grade condition, choose an item from the Grade condition menu (1) and enter a minimum percentage (2). The maximum percentage is optional (3).
To set the Grade condition, choose an item from the Grade condition menu (1) and enter a minimum percentage (2). The maximum percentage is optional (3).
Visibility

By default, course sections or items which are controlled by access restrictions are entirely hidden from students. In this case, students would not see Week 2 in the class until they have completed the quiz with 80% correct and the date is later than August 17th. This can be confusing to students and may lead to questions about missing course materials. A better option is to Show section greyed-out, with restriction information.
Note that as an instructor or someone with another role which allows editing, the section of the class with access restrictions will continue to be visible to you. See below for switching to the student role to check on what students will see.
Note that as an instructor or someone with another role which allows editing, the section of the class with access restrictions will continue to be visible to you. See below for switching to the student role to check on what students will see.
Show section greyed-out, with restriction information.
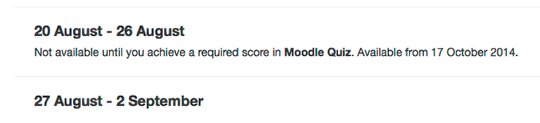
When you choose to Show section greyed-out, with restriction information, students will see a message indicating what conditions need to be met before they can access that section of the course.
Note that if you choose Hide section entirely and you make the section invisible to students after a particular date, this will also hide any graded items from that section of the course in the grade book, so this is not a good option if you have anything to be graded in a section of the course which uses access restrictions. If you set up access restrictions individually for graded activities, Hide section entirely will also hide those activities in the grade book. Show section greyed-out, with restriction information is a better choice.
Note that if you choose Hide section entirely and you make the section invisible to students after a particular date, this will also hide any graded items from that section of the course in the grade book, so this is not a good option if you have anything to be graded in a section of the course which uses access restrictions. If you set up access restrictions individually for graded activities, Hide section entirely will also hide those activities in the grade book. Show section greyed-out, with restriction information is a better choice.
Check to see what the student will see

It is a good idea to preview what students will see when you are setting up access restrictions. Choose Student under Switch role to... in the Settings block to see what students will see. Switch back to your original role to resume editing.
Comments